This is an old revision of the document!
Compressed Graphics Tutorial
In this tutorial, we will edit a compressed graphic with the help of four utilities. We will first decompress from the ROM the graphic, modify its palette in the ROM, edit the graphic and finally compress the new graphic in the ROM.
The Tools
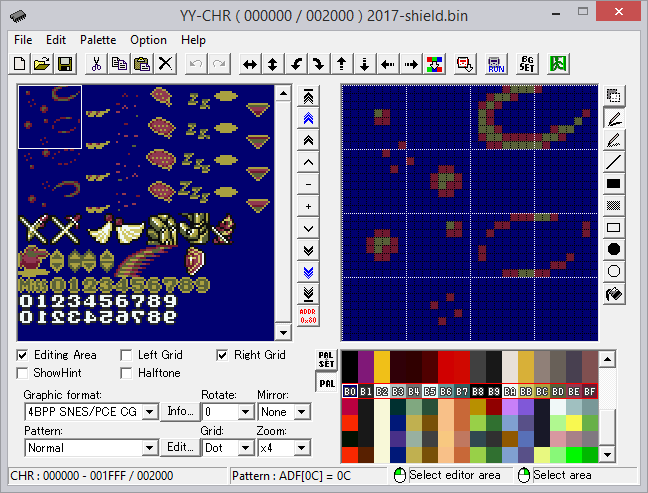
The first utility you will need is Peer Sprite Viewer (PSV). This utility can compress and decompress data from the FF3us and Chrono Trigger ROM. Secondly you will need YY-CHR. There is a .NET version and a C++ version. I personally go with the C++ one; it is older, but it has more features that have not yet been ported to the .NET version. The image shown here is from the C++ version. The other utility required is SNESpal, which can modify color palettes in the ROM.
Finally you will need an all purpose image editor. My favorite one is Gimp for many things, including icon making, spriting and other graphics editing. Visit gimp.org for the latest version.
Decompressing the Graphic
The first thing to do is to locate what you need to decompress. We have a Compressed Data List which include graphics. Alternatively, you can look at the ROM Map but theoretically everything should be in the Compressed Data List. We will take for this tutorial the battle shield used in shield blocks by party members. It is part of a bigger graphic sheet, meaning you cannot just decompress / compress the shield alone. Modifying the shield will have an impact on the size and arrangement of the data once re-compressed.
The battle graphics we are looking for are at $D2E000 (unheadered ROM). This is $12E000 in absolute addressing. If you open a hex editor and go at this address, you'll see the following:

The first two bytes are always an inverted word of the compressed data size. This mean our graphics are $0B44 bytes in size (including the first two bytes), meaning they are from $D2E000 to $D2EB43. The wiki list the graphic ending at $D2EBFF, which is not totally false since $D2EB44-$D2EBFF is unused space. However, while the starting offset will always likely be good, I suggest you check the data size to decompress the exact amount of data.
Open your ROM in Peer Sprite Viewer (PSV). You'll see the main interface:
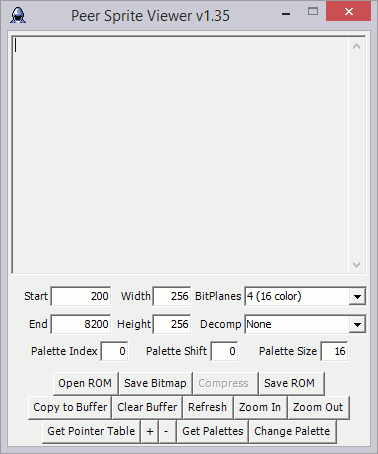
Start is your starting offset, End is your ending offset, Width and Height are the wanted dimensions of your decompressed graphic, BitPlane is the type of graphic once decompressed and Decomp is the compression type. I have always kept the BitPlanes value as 4 (16 colors) for FF3us and obviously Decomp value should be set as Final Fantasy VI. This screenshot show the correct values to enter for our example. Now click Copy to Buffer.
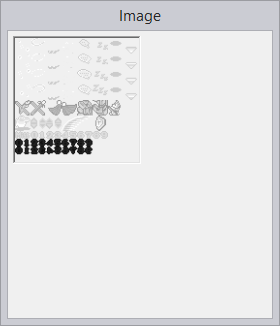
You should see the graphics in another window. Note that you can modify the sheet size and re-click on Copy to Buffer to get the right size. Here are the same graphics, first screenshot is default 256×256 and second one is 128×128. This does not change much, only it will be easier to edit if you got the correct size.

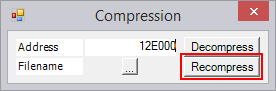
The next step is saving this graphic into a file. Click Compress and you will see this window:
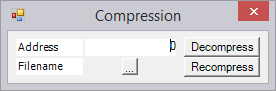
Enter the same starting offset ($12E000) and click … to enter a filename with the extension of your choice (a lot of people use .bin to hint at a binary file). Finally click Decompress, as shown here. Your GFX is now saved in a file we will next edit with YY-CHR.
Finding and Editing the Palette
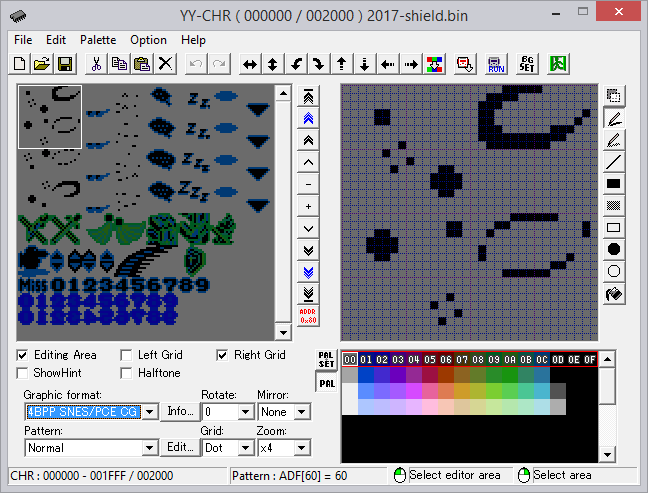
Now we need to use YY-CHR. If you want the compressed files and correct savestate to load the palette, you can download them here. When you lad the decompressed GFX, it should look like this. No need to worry here, we will load the palette from a ZSNES savestate which was taken when the shield was on screen. Do Palette → Load Emulator state file and select your savestate. Click Pal at the bottom right window and try each palette until you get the correct one. It should now look like this: